The Moviemaker’s Workspace:
Towards a 3D Environment
for Pre-Visualization
by
Scott Clark Higgins
B.S., Mathematics
University of California, Los Angeles (1987)
Submitted to the Program in Media Arts and Sciences,
School of Architecture and Planning,
in Partial Fulfillment of the requirements of the degree of
MASTER OF SCIENCE
in Media Arts and Sciences
at the
Massachusetts Institute of Technology
September 1994
© Massachusetts Institute of Technology, 1994
All Rights Reserved
Author
Program in Media Arts and Sciences
August 5, 1994
Certified by
Glorianna Davenport
Associate Professor of Media Technology
Program in Media Arts and Sciences
Thesis Supervisor
Accepted by
Stephen A. Benton
Chairperson
Departmental Committee on Graduate Students
Program in Media Arts and Sciences
The Moviemaker’s Workspace:
Towards a 3D Environment
for Pre-Visualization
by
Scott Clark Higgins
Submitted to the Program in Media Arts and Sciences,
School of Architecture and Planning
on August 5, 1994
in Partial Fulfillment of the requirements of the degree of
MASTER OF SCIENCE
in Media Arts and Sciences
at the
Massachusetts Institute of Technology
Abstract
This thesis explores problems related to the use of 3D computer graphics environments for cinematic pre-visualization. Traditional 3D environments are difficult for moviemakers to use both because they are slow and the interface does not provide the moviemaker with an appropriate language for creating camera views.
The Moviemaker’s Workspace was developed to explore a knowledge based solution to this problem. Central goals of the system were to provide a cinematically acceptable interface, and to the greatest extent possible to speed up the blocking of characters and action on the set. The solutions were tested by simulating a pre-visualization of the motion picture Casablanca.
The thesis work implemented three aspects of a pre-visualization interface. First, the system transcodes the familiar cinematic language into computer graphics views. Second, the system makes use of 2D video objects to simulate 3D characters. Finally, the system has limited knowledge about styles of cinematic scenes.
The Moviemaker’s Workspace:
Towards a 3D Environment
for Pre-Visualization
by
Scott Clark Higgins
The following people served as readers for this thesis:
Reader
V. Michael Bove, Jr.
Associate Professor of Media Technology
Program in Media Arts and Sciences
Reader
Douglas Trumbull
President
Ridefilm Corporation
Acknowledgments
Many people have helped in the creation of this thesis. I wish to thank them for their inspiration, support and guidance.
Andy Hong and Eddie Elliott deserve credit for getting me to the Media Laboratory in the first place: Andy for first telling me about the Lab; and Eddie for actually handing me the application.
Glorianna Davenport for allowing me the opportunity to study at the Media Lab, and giving me the time, resources and support to pursue the research described in this document.
My readers V. Michael Bove, Jr. and Douglas Trumbull for taking the time from their busy schedules to offer suggestions and insightful comments.
My officemate of the past two years, Lee Morgenroth. May we both always be able to travel and create movies, especially the two together.
Special mentions go to Steven Drucker and Ryan Evans for always having an answer to my questions, from where to find a good cheap restaurant in the North End to the mysteries of UNIX.
The members of the Interactive Cinema group who were always helpful whether it was to answer a question, to discuss the latest cinematic opus or for lunch: Kevin Brooks, Betsy Brown, Stuart Cody, Eddie Elliott, Ryan Evans, Tinsley Galyean, Mark Halliday, Gilberte Houbart, David "Kungtinuity" Kung, Tim Kwan, Lee Morgenroth, Mike Murtaugh, Takeshi Nitta, James Seo, Cyrus Shaoul, David Tamés, Natalia Tsarkova, Koichi Yamagata and Erhhung Yuan.
The undergraduate researchers who assisted me with coding: Andrew Beechum and Shu-Horng (Douglas) Shieh.
Several people outside of the Interactive Cinema group have also provided me with invaluable assistance along the way: Bruce Blumberg, Michael "Wave" Johnson, Renya Onasick and Louis Weitzman.
The cast and crew of the Casablanca shoot, for all their efforts and patience: Andrew Beechum, David Tamés, Natalia Tsarkova (Ilsa) and Craig White (Rick).
Stuart Ng at the USC Warner Bros. Archive, and Leith Adams and Jeremy Williams at Warner Bros. for their assistance in obtaining set diagrams from the film Casablanca.
My family, mom, dad and Stephanie, who first introduced me to moving images and have always supported in whatever bizarre adventure I have chosen to pursue.
Dena, who has put up with the past two years and the 2612 miles between us: thank you for everything. (A promotional consideration was paid to United Airlines and MCI Telecommunications during the duration of this thesis.)
Contents
1. Introduction 8
3D Pre-Visualization 8
Modeling 10
Interaction and Interface 10
Cinematic knowledge 11
Reader’s Guide 12
2. Pre-Visualization 14
What is pre-visualization? 14
Why is pre-visualization useful? 15
Current Methods of Pre-Visualization 15
Storyboards 16
Camera plan views 18
Models 18
Animatics 19
3D computer graphics and computer aided design 19
Principles of Pre-Visualization 20
Speed 20
Usability 20
Reusability 21
3. Moviemaker’s Workspace: An Overview 22
3D Pre-Visualization 22
Why is 3D pre-visualization difficult to use? 23
Cinematic Language 24
The Environment 26
Camera Plan View 28
Edit window 29
Framing Window 30
System Architecture 31
4. Background and Related Work 32
Background 32
Virtual cameras 32
Some computer graphics definitions 34
Related Work 35
Intelligent Cameras 35
Automated presentation 36
Cinematic Style in a Computer Graphics Environment 36
3D Modeling 37
5. Video Objects 38
Video Objects Defined 39
Segmentation 41
Trade-Offs 41
Video Object Production 43
Limitations of Video Objects 43
6. Camera Framing & Motion 44
Shooting Scripts 45
Camera Framing 46
Close-Up 48
Medium Shot 49
Full Shot 49
Long Shot / Establishing Shot 50
Gaze Vector 51
Point of View (POV) Shot 52
Two Shot 53
180° Rule 53
Over the Shoulder Shot 55
Triangle System 56
Camera Motion 57
Tracking shot 57
7. Cinema Languages 59
Master Scene Cinema Language 60
Master Scene Template 61
Interpersonal Cinema Language 63
Interpersonal Template 63
8. Future Directions 65
Gesture 65
Interactive movies 65
Structured video 65
Production and post-production tools 66
9. Conclusion 67
References 68
Cinema is moving images and sounds. How a moviemaker controls those images and sounds determines the type of experience the viewer will have. There are a plethora of options a moviemaker has at almost any point in the story: where to place the camera, should it be moving or static, should the actors remain stationary or move about, what should be revealed to the viewer, what should remain out of sight, and where should the scene be shot, to name a few.
Many of these decisions are determined before shooting begins. Because of the time and expense required to create motion pictures, much effort is spent before shooting begins to organize and plan the production. The process of planning, designing and conveying of images, sequences and scenes before their actual production is called pre-visualization. This thesis is concerned with how images are shaped and controlled during pre-production, or the planning stage, and how a moviemaker can pre-visualize a motion picture.
Traditionally, most pre-visualizations have been created by hand; storyboards, models and plan diagrams are generally designed to communicate the moviemaker’s ideas to the production crew and as a tool for firming up a director’s vision. Many moviemakers have had to express their ideas to a storyboard artist before they could be shown to the rest of the crew. This form of communication has been the traditional dynamic for expressing a director’s vision.
3D Pre-Visualization
As the speed and usability of computers increases, the nature of this conversational dynamic is changing the motion picture industry. During the post-production phase, the stage after shooting which is mainly concerned with editing, computers have been used to create special effects and to assist in video editing. They are currently beginning to impact the pre-production phase as a pre-visualization tool. These early computer-assisted pre-visualizations typically involve a 3D model of a set or location, providing the ability to interactively position a virtual camera anywhere within the environment. Characters, usually in the form of 3D models, are then added to create an animation. These emerging tools allow moviemakers to experiment with scenes before their actual production and to increase effective communication among the crew. As technology progresses from hand-crafted tools to digital ones, a new conversational dynamic or paradigm needs to be created for interfacing with these new digital pre-visualization and motion picture production tools. This thesis describes one such 3D pre-visualization tool, the Moviemaker’s Workspace, which serves as a preliminary step in the creation of a new conversational dynamic in pre-visualization.
An example of the utility of pre-visualization can be found in the film Citizen Kane. Gregg Toland, the cinematographer for Citizen Kane, writes: "The photographic approach to Citizen Kane was planned and considered long before the first camera turned (Toland 1971)." Not every film can be a Citizen Kane of course, but certainly most films can benefit from pre-visualization. The problem is putting the appropriate tools into the moviemaker’s hands. Most contemporary pre-visualization tools are designed to communicate the moviemaker’s ideas to the production team; they are not designed to enhance creativity by allowing the moviemaker to explore new visual possibilities.
3D pre-visualization provides the moviemaker with improved communication with the production team. It enables the moviemaker to show the crew exactly the images that are to be produced, with less hand waving in an attempt to convey a moving image. These new tools also allow for increased communication between the various phases of a motion picture. Information can not only be passed on to the production crew, but also be used to assist in post-production and viewing. Traditionally, each stage of a motion picture starts off from scratch, not making much use of the information gained and collected in prior stages. These digital tools will not only allow later stages to reuse information, but the later stages can be engaged earlier in the process.
3D pre-visualization can give moviemakers new tools, but it is difficult to use. The process of creating an environment, called modeling, is time-consuming and complex, especially when modeling human actors. Video objects are presented as a method for creating realistic and computationally efficient human models. Current 3D systems are more concerned with how to display images from an environment than enabling users to create specific output.
Modeling
The first step in using a 3D pre-visualization is to create a geometric model of the environment to be viewed. One of the more complex tasks in modeling is creating accurate and realistic models of the human characters. Most current models are either too complex — the time to model and render such images is too long, or the model is not realistic — resembling a collection of polygons more than a human actor. The Moviemaker’s Workspace uses still and video imagery to simulate the likeness of an actor, while maintaining some 3D information. These objects, called video objects, will be described in chapter five.
Interaction and Interface
One advantage of 3D pre-visualization is the ability to explore an environment before its actual production. This interactivity is one of the most compelling reasons to use such a system. The user can reposition the camera, change an actor’s blocking or add a new light, then see the resultant picture as fast as the computer can render a new image. This ability to interact with a likeness of the set before it is built enables moviemakers to make more decisions during the initial phase of pre-production. Interaction is an essential element of 3D pre-visualization. It provides a main motivation for using this type of tool.
This dynamic will require new methods of interfacing with 3D computer graphics systems. Thus far, most current 3D computer graphics systems developed have concentrated on how to give the viewer the ability to see all possible images within the environment rather than focus on how the user can view a desired image. Users can typically move on-screen widgets with a mouse or manipulate external devices, such as a joystick or a head-mounted display, to navigate the 3D environment. While these navigation methods are suitable for exploring an environment, they rarely prove useful when trying to view a particular element of the environment. These methods cannot easily give the viewer an image of a desired object in response to a user’s request to look at a particular item (e.g. "show me a view of the apple"). If the user wishes to view a particular object with a joystick, they must manipulate the joystick to find the object within the environment. Not only is this method time-consuming, it can be frustrating as the user attempts to maneuver the view such that the desired object is in the correct position.
However, given the relation of pre-visualization to motion picture production, it seems logical to map a language more familiar to moviemakers to traditional computer graphics terms. These new digital tools will be placed directly in the hands of those in creative positions. In terms of motion picture pre-visualization, these people include directors, cinematographers, production designers and editors. In order to take advantage of the expertise of these users, a pre-visualization system should operate within their language, the language of the cinema. Cinema has developed a language for describing and controlling moving images. There also exists a body of cinematic knowledge that these expert users possess.
Cinematic knowledge
It is desirable to break away from the reliance on computer terminology. The typical computer animation program still is filled with terms from or relating to the mathematical derivations of the viewing transformation: scale, B-spline, clipping plane, transform and Gouraud shading. Hence, the development of a language more familiar to moviemakers, the language of the cinema, is an appropriate choice (e.g. close-up). This idea began as a way to find a mapping between the language of computer graphics and cinema that would make the use of a computer graphics environment simpler for pre-visualization.
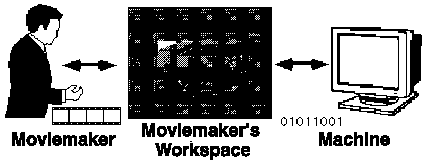
Figure 1. Moviemaker’s Workspace.
One solution to this problem of usability is to incorporate the moviemaker’s cinematic knowledge. This thesis is concerned with the encoding of cinematic knowledge to make simpler the process of creating and using 3D pre-visualization. Encoding cinematic knowledge is the process of giving the computer information on the process of motion picture production. By giving the system knowledge of cinema, intelligent suggestions can be offered to the user. Creativity and productivity can increase while using a pre-visualization tool. This cinematic knowledge can be codified into a cinematic-like language, similar to the one that already exists in the motion picture industry.
Reader’s Guide
Chapter 2 discusses the notion of pre-visualization, what is it used for and why is it currently difficult. Current methods of pre-visualization and principles of pre-visualization are also listed.
Chapter 3 describes the design principles and salient features of the Moviemaker’s Workspace. The use of a cinematic language for simplifying the process of using a 3D pre-visualization is also explored.
Chapter 4 discusses some relevant background details about computer graphics systems and related research, particularly in 3D computer graphics.
Chapter 5 concerns methods for creating 3D models, including a strategy for creating characters for a 3D environment called video objects.
Chapter 6 discusses the issue of interacting with a 3D pre-visualization and the development of the Moviemaker’s Workspace interface, which uses a cinematic language for camera framing and motion.
Chapter 7 explores the advantage of using a high-level cinematic languages, such as master scene, to assist in pre-visualization.
Chapter 8 points the way for possible future directions of research.
Chapter 9 draws some conclusions on this thesis.
2. Pre-Visualization
In essence, visualization involves making something visible. In terms of motion pictures, visualizing a scene involves planning the images to be recorded. For the past century artists have been hired to draw the details of a scene. These images are translated into set design, camera angles, blocking of the actors, and the behavior of the camera. This process can be either as simple as setting up miniature figures in the dirt and getting down to eye level with them; or as elaborate as a recent Sony Image Works visualization for Columbia Pictures Striking Distance (Sanders 1993). In the film, a car chase sequence was recreated in exact detail as a 3D animation before the scene was shot, and then the visualization was replicated almost frame by frame in the final filmic version.
What is pre-visualization?
Any pre-visualization involves a series of trade-offs. Should all the scenes in the movie be considered, or just a few key ones? How much background detail should be included in these models? How many props should be included in the pre-visualization? How many of the characters are needed; just the primary ones, or each character in every scene? These variables must be weighed against the needs of the movie’s production. Storyboards, plan diagrams, shooting scripts, models and photographs are all used for pre-visualization. Videotape from handheld cameras, storyboards recorded using a computer-controlled camera, as well as commercial and found footage can be edited together to form a proof-of-concept tape. This tape, often called an animatic, is used to visualize ideas in moving images. Animatics are often used as an aid for getting approval or financing for a project. Pre-visualization as a tool is most effective when it allows the moviemaker to quickly and efficiently visualize a scene. Time spent using a pre-visualization tool is critical. Generally it is not used to evaluate performance, but rather to consider the logistics of the production and to plan the process of shooting. Camera placement, selection of background details and proof-of-concept are typical uses for pre-visualization.
Pre-visualizations are particular to the task they are trying to solve. A special effects sequence often requires more planning and visualizing than does a dialogue between two seated characters. Each film has its own needs for pre-visualization, considering films can range from large-budget Hollywood films to independent films produced all over the world. All moviemakers have the need for pre-visualization, but they also are all limited by the production constraints of time and money. In a perfect world, all scenes could be completely pre-visualized. Unfortunately, the demands of most production cycles will not allow this degree of planning with the current pre-visualization tools. Currently only the most elaborate and difficult scenes warrant the expense, in both labor and cost, to create a 3D model of a particular scene.
Why is pre-visualization useful?
Pre-visualization is the ability to translate a moviemaker’s ideas into a usable format for sharing with other crew members and for finding creative solutions for cinematic situations. In creating a film, or any series of moving images, the creators are confronted with many challenges. Primarily, these include how to articulate the moviemaker’s vision to the production crew, and how to most effectively and efficiently design and orchestrate the images that viewers will see. To this end, pre-visualization is a planning tool for moviemakers that enhances creativity, allowing them to see new visual possibilities by experimenting with the camera’s behavior, as well as other variables of the environment. Pre-visualization can be used to evaluate the production’s cost by highlighting expensive scenes, and to illuminate methods of reducing cost. The more planning and pre-visualization done before shooting begins, the more likely the whole experience will be cohesive and meaningful. By allowing moving image creators to visualize a production environment, creators gain the ability to refine their output before production has begun. Pre-visualizing special effects scenes, which often must be shot in one take, are especially useful. With only one chance to capture the scene, all aspects of pre-visualization must be worked out in advance of production.
Current Methods of Pre-Visualization
The notion of pre-visualizing a scene that will eventually be recorded is not a new practice. People have been attempting to pre-visualize films since the earliest days of cinema. This stage of visualization does not have to be complicated, digital or elaborate. However the process must meet the needs of the moviemaker. It should convey some idea of the scene to be recorded and communicate the requirements of the scene to the production team.
Storyboards
The traditional method for conveying a moviemaker’s vision is with storyboards. Storyboards typically show a series of hand-drawn, still images representing salient details from a scene or sequence of moving images. Storyboards attempt to convey the shot flow of a scene, as well as the set design and editing. They are the standard method for communicating ideas about the images to the production crew. But storyboards are limited in what they can represent. Storyboards can only hint at showing camera or character motion. The main drawback of storyboards for pre-visualization is the lack of interaction. They do not permit the moviemaker to easily explore different camera angles and positions.
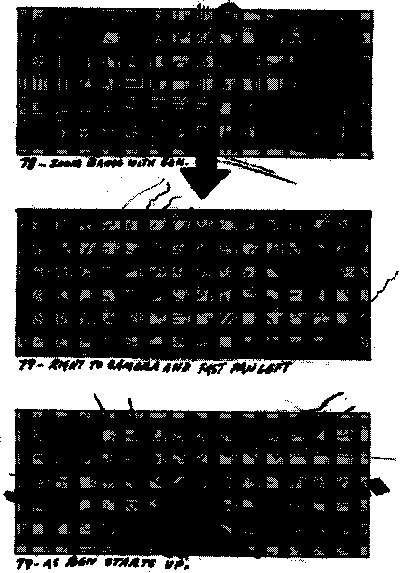
Figure 2. Storyboard.
Harold Michelson’s storyboards for The Graduate (Katz 1991).Camera plan views
Camera plan views are a common method of diagramming a scene with complex camera movements. Typically, it is a plan view of a set with a denotation of camera positions, camera motion, if any, and field of view markings for each camera. Each camera is indicated in its actual position within the plan view of the set. Usually the field of view, and hence the focal length of the lens, is indicated by lines showing what part of the set will be in view. If there is any camera motion, it is usually indicated by lines showing the path that the camera will take. Alfred Hitchcock is famous for his detailed camera plan views of scenes from his films.
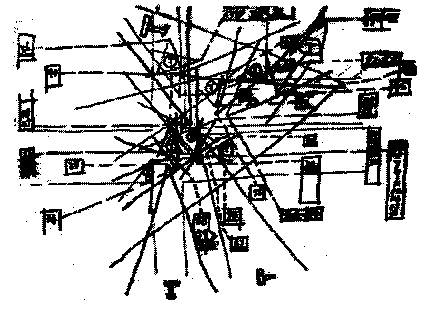
Figure 3. Camera Plan View
. This drawing is a camera plan view of the cropdusting sequence in Alfred Hitchcock’s North by Northwest. The numbers refer to camera positions with the two lines in the shape of a V representing the field of view for that camera (Hitchcock 1988).Models
Miniature models of complex sets are a useful method for visualizing a set in three dimensions. Models are costly and time-consuming to produce, but they do allow a type of interaction impossible in storyboards. The moviemaker and production personnel can view the model from various positions to get a better understanding of the spatial qualities of the set.
Animatics
Animatics have become a common method of pre-visualizing moving images. They may take many forms. One version is to record storyboard images onto videotape with the length of time for each storyboard image equal to the shot length. If one has access to a computer-controlled camera, simple moves can be made on the still images of the storyboard to give the effect of what the motion may ultimately look like. A simple type of animatic involves capturing footage on a consumer video camera. These images can then be edited together to create the pre-visualization. Another type of animatic, often called a rip-o-matic in the advertising realm, is to edit together portions of found footage. Often this found footage can include the competition’s commercials, portions of movies and footage from a consumer camera.
3D computer graphics and computer aided design
3D computer graphics and computer-aided design (CAD) programs have allowed computer-savvy moviemakers to create interactive visualizations. By creating a 3D model of a set and adding representations for the actors, moviemakers can move the system’s virtual camera anywhere in the environment. These systems are still relatively new and are just beginning to gain widespread use. Paramount Pictures recently created a 3D model of the Addams mansion for the film Addams Family Values. A model plane dog fight sequence was not shot for the movie based on using this computer-assisted pre-visualization. Examples of commercial 3D modeling and animation applications include programs from Alias, SOFTIMAGE, Vertigo and Wavefront on the Silicon Graphics (SGI) platform; and StrataVision 3d and Virtus on the Apple Macintosh platform. These systems not only permit the user to see the image from a specified camera, but they can enable the user to interactively reposition that camera. The user can change the lens, or field of view, for example, and see the result on the screen. Animations with moving characters enable the user to view the scene in motion. Since the computer can represent the three dimensions of the set, a moviemaker using such a system can perform a similar function to the camera on the set: the transformation from the set’s three dimensions to the screen’s two dimensions. The power of 3D pre-visualization lies in its ability to perform this transformation and make changes before the set has actually been built or any decisions have been formalized.
Principles of Pre-Visualization
It is useful at this stage to list some of the basic principles of a creating a useful 3D pre-visualization system. As more of the tools for cinematic production become digital, the entire motion picture process is heading towards becoming completely digital. To deal with this change, we need a new set of criteria for digital motion picture production, particularly pre-visualization. For pre-visualization to be effective, it should allow for quick and inexpensive experimentation, improved communication between crew members, and less expenditure of both time and money. To meet these goals, the following lists key principles which a 3D pre-visualization system should have.
Speed
Speed is usually the first quality that a user notices about a system. How many frames per second can the system render? How quickly can it turn my ideas into moving images? For pre-visualization, speed is a paramount issue, as measured in both rendering speed and the system’s ability to allow the user to create a series of images. In an ideal world, a computer graphics system could render 24 (film), 25 (PAL and SECAM video) or 30 (NTSC video) frames per second without any artifacts. Currently, frame rates on these orders are only possible with the simplest of models and at relatively low resolutions — 640 x 480 pixels is a commonly used image size with eight bits per color channel. Film resolutions can be up to 4000 x 4000 with 12 bits per color channel. While a pre-visualization system does not need frame rates or resolution to match the final image, there will always be pressure for a pre-visualization to come as close as possible to the performance of the final format. Moviemakers will want to see images that match the final format as close as possible.
Usability
Closely aligned with the issue of speed is the system’s usability. Usability, for pre-visualization, is the ease with which a user can create the desired moving images, including both the creation of the model and any animation, as well as the manipulation of the objects and cameras in the environment. All these different stages are essential so that moviemakers can easily translate their ideas into moving pictures. 3D pre-visualization systems will also need to enable moviemakers to quickly turn their ideas into moving pictures. These systems will be judged by how fast the users can take an idea and show it to someone else.
Reusability
An advantage to having digital data is its ability to be reused in other domains. By creating a model of the set and an animation, that information can be used by other personnel and be reused in stages of production. One current problem in motion picture production is communicating visual ideas to other members of the production team. 3D pre-visualization will not only facilitate a clearer means of communicating these ideas, but it will enable other personnel to make simple suggestions by manipulating or reorganizing the digital data. With the assistance of computer networking, the production designer, for instance, can be updating the set, while the cinematographer is working out complex camera moves on the same model. This information can then be used during production, for example, to assist in staging complex motion-controlled camera moves. In post-production, the digital data can be used during the generation of special effects. At the viewing stage, this information can be employed by new forthcoming television platforms that take advantage of structured, or model-based video.
3. Moviemaker’s Workspace: An Overview
As digital tools enter into greater use in the motion picture production process, a new dynamic will be created for their use. For example, editors are currently making the transition from actually cutting film to using digital non-linear editing systems. There will be a corresponding change in how pre-visualizations, and motion pictures themselves, are created as well. Traditionally, most pre-visualizations have been created by hand. The new digital tools will replace some of the drawing done by hand with machines. There is a need to create a new conversational dynamic between the machine and the moviemaker.
The Moviemaker’s Workspace presents a system that begins to bridge this new conversational dynamic by merging computer animation and motion picture production. In the past, merging these processes has meant simply the ability to create any moving images in a computer graphics environment. The Moviemaker’s Workspace, on the other hand, merges these two by incorporating cinematic principles into a traditional computer graphics environment. The system also combines the usually separate stages of animation and editing. In this sense, the system can be thought of as a creative environment for mixing pre-production planning with functions usually reserved for production and post-production. The user is able to animate characters, blocking, during the same phase as they are able to create a simple edit.
3D Pre-Visualization
A natural extension of 3D pre-visualizations is to edit with the 3D animation scene before production has begun. As an editor, I have been in editing suites with clients who still have little idea of what shape they want the piece to take even after they are in the editing room. Part of pre-visualization is the ability to visualize shot flow, or editing, before production begins. With the appropriate tools, the editing process can be started well before production. Many current productions have editors working on material during production. These editors are working the dallies, or rushes, as soon as they can get the material; occasionally, they are on the set during production. 3D pre-visualization will only accelerate this process as editing continues to be initiated earlier in the production process. The ability to visualize shot flow with moving images before production enables moviemakers to visualize new forms of shot flow that might not have been apparent with other forms of pre-visualization.
This editing ability can also impact the production process itself. Currently most time during actual production on a feature-length motion picture is spent on lighting, arranging and adjusting the lights. Every time the camera is moved for a new set-up, the lighting must be changed. The number of set-ups is directly proportional to amount of time spent during production. One method of reducing cost is to limit the number of set-ups and coverage. Coverage is the process of shooting more versions of a scene than necessary. As some editorial decisions can be made prior to production, the amount of coverage or variations of a scene can be reduced. By refining the pre-visualization and pre-production processes, time, and hence money, can be maximized during production.
Why is 3D pre-visualization difficult to use?
As mentioned in the introduction, these current 3D pre-visualization environments are difficult to use for two main reasons. First, creating the geometric models is both time-consuming and difficult. Further, the ease of manipulating the objects in the environment and controlling the virtual camera’s behavior causes another problematic element. The latter difficulties, manipulating the objects and controlling the camera, is referred to as the user’s interaction with the environment. A key ingredient of any pre-visualization is time — both the time necessary to create the environment and the time necessary to use the system for generating and investigating the desired images.
Making 3D models is still a time intensive task. A model with any object more complicated than simple cubes requires both advanced knowledge of the modeling application and time to develop a realistic environment. Most current CAD applications are designed for creating complex and detailed models for engineering, drafting or industrial design purposes. Accordingly they contain features to meet those needs. The interfaces are designed for engineering purposes. They are not designed for the rapid prototyping of sets for pre-visualization. Once a suitable rendition of the set has been created, the essential tasks remain of adding characters and motion. In current cinematic pre-visualization, these tasks are usually left for an assistant because of the degree of difficulty and time required to create human models and the animation. Since most modeling and animation applications are concerned with giving their users every possible feature, they are not well suited for a task of pre-visualization. Cinematic pre-visualization has some particular tasks that it is trying to solve. In pre-visualization, the moviemaker has extensive knowledge of cinema and is concerned with creating a series of moving pictures rapidly. The 3D pre-visualization user is less concerned with every detail of the model. Ideally, the user should be able to create a basic representation of the set with animated characters easily.
Cinematic Language
Just because the raw tools have become available to pre-visualize a scene in 3D does not mean that moviemakers will use them. The effort and time to interact with a 3D pre-visualization is still formidable. The task that the Moviemaker’s Workspace seeks to address is to reduce this time and effort spent creating and using the environment so that more time can be spent on creative, not technical, tasks.
In pre-visualization for motion pictures, a moviemaker often has a specific shot of a particular character in mind (e.g. "a shot of Rick"). The issue then becomes how does the system show the user the appropriate image. It is no longer sufficient just to allow the user to manipulate various widgets to find a particular image. The user needs a higher level method for navigating the environment. The system should act as an agent for the user in positioning the virtual camera. It would process a user request (e.g. "show me a shot of Rick"), and return an appropriate image. The user should not have to manipulate the virtual camera to see a particular image; the system should be able to display it for the user.
Over the past century, moviemakers have created and refined a vocabulary and grammar for describing moving images. Since this language was designed for cinematic images, it is well suited as an interface for describing images in a 3D environment, especially for use by moviemakers. Computer graphics has matured to a point where other languages can be built on top it as an interface for other uses. By using such a language, a moviemaker can easily manipulate a virtual camera by employing an already known language. If a moviemaker can ask the system for a specific shot of a particular character (e.g. "close-up of Rick), as opposed to having to manipulate various widgets to get a similar result, the moviemaker has saved time and frustration. This process of allowing a 3D pre-visualization system the ability to understand cinematic terms is referred to as encoding cinematic knowledge.
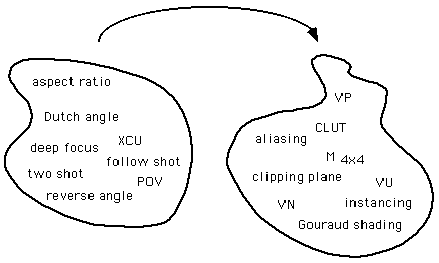
Figure 4. Mapping Cinematic Terms to Computer Graphics Terms.
This cinematic language can be used as a shorthand for moviemakers when using a 3D pre-visualization. This language also allows for fluid interaction with an environment and the rapid ability to test new ideas. The notion is to build an interface which suits both the task to be solved and the user who will interact with the system. In creating a pre-visualization tool for motion pictures, the interface should operate in the language of cinema.
The Environment
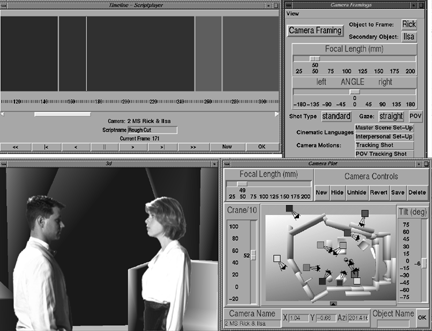
Figure 5. The Interface of the Moviemaker’s Workspace.
To demonstrate these ideas, the Moviemaker’s Workspace uses an animation of a scene from Casablanca as a sample environment. The scene takes place in Rick’s (Humphrey Bogart) apartment in Casablanca in which Ilsa (Ingrid Bergman) utters her famous line of "I tried to stay away." The set was modeled from blueprints of the actual set and simulates pre-visualizing a scene. Blueprints were acquired from the Warner Bros. Archive, School of Cinema and Television, University of Southern California, for the purpose of realizing a pre-visualization of a major motion picture. For non-moviemakers, it is important to notice the degree of detail in this blueprint.
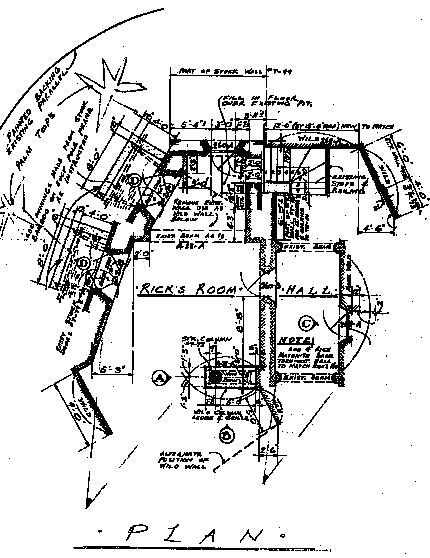
Figure 6. Blueprint for Casablanca Scene.
Courtesy of Warner Bros., from the Warner Bros. Archive, School of Cinema and Television, University of Southern California.The Moviemaker’s Workspace currently consists of four parts. All are designed to work together to allow for fast and simple pre-visualization. The parts are the camera plan view, timeline, the framing window and an output window, which displays the resultant images. The Moviemaker’s Workspace is a simple 3D computer graphics environment with many features specialized for pre-visualization. The following sections detail some salient features of the Moviemaker’s Workspace.
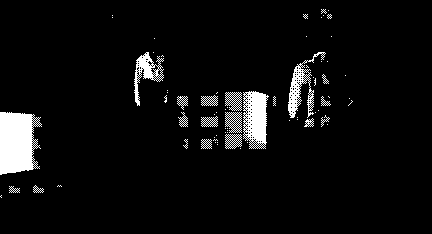
Figure 7. Sample Output of the Moviemaker’s Workspace.
Camera Plan View
"To translate scenes from script to pictures ... we need solutions for the editorial problems that will arise in different situations. To achieve this we must control two things: 1) The distance from which we record the event 2) The motions of the subjects performing that event (Arijon 1976)." These two tasks, positioning the camera and moving the characters, are the main goals of the Moviemaker’s Workspace’s camera plan view. The camera plan view is an interactive version of a standard camera plan view of the set or location. The square boxes in figure 8 represent a camera’s position with the arrows representing the direction that the camera is facing. Similar to the Hitchcock’s camera plan diagram, the two lines on either side of the arrow represent the field of view, and hence focal length, for that particular lens. The exact lens length can be read from the focal length slider.
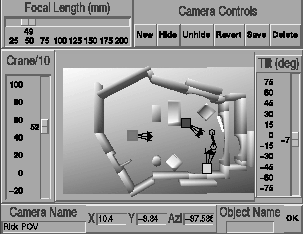
Figure 8. Camera Plan View.
Unlike traditional camera plan views, this view enables the user to relocate the camera by clicking on the box representing the camera and placing it in the desired location. The output is updated as fast as the workstation can render the new image. A new camera can be created by double-clicking on the plan view where the user would like to place a new camera. The new camera is framed pointing towards the desired character and such that the top of the character’s head is centered near the top of the frame. The camera plan view also enables moviemakers to move the characters by simply placing the dot representing that character in the new location. The user can create a path for the character by drawing a path for the character to follow.
Edit window
The editing window contains a timeline that permits moviemakers to create simple edits. The units of the timeline are frame numbers, not time. The creation of a time-based computer animation rendering system is beyond the scope of this thesis. The Moviemaker’s Workspace uses a simple frame-based animation scheme. The user is able to create a list of camera positions and the frames over which each camera position is valid. The color code in the timeline window matches the color of the camera in the camera plan view. In this manner, the user can create an edit in a manner similar to working with a non-linear edit system.
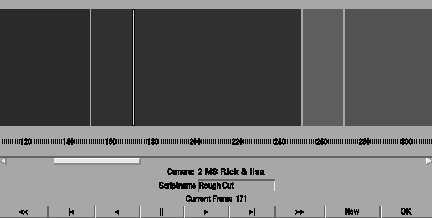
Figure 9. Editing Timeline.
Framing Window
The framing window allows the user to set-up new shots. It enables the user to navigate the environment by using the standard camera framing terms, such as close-up and long shot. Camera framings will be defined and discussed in chapter six. Rather than manipulating on-screen widgets, the user is able to generate a shot based on the size of the character desired. The user can also choose from various aspect ratios, the ratio of the width to the height of the image: standard 16mm, 35mm academy aperture and television (the screen’s width is 1.33 times the screen’s height, or 1.33:1); European wide screen (1.66:1); US wide screen (1.85:1); 70mm (2.2:1) and Panavision, anamorphic (2.35:1). All examples of the system output in this document are in 1.85:1. Moviemakes can also set the direction that the character to be viewed is facing, as well as the lens to be used.
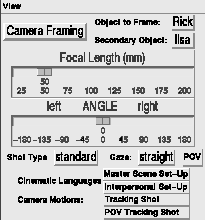
Figure 10. Framing Window.
System Architecture
In the early 1990’s, David Zeltzer, director of the Computer Graphics and Animation group at the Massachusetts Institute of Technology’s Media Laboratory, began developing tools which would enable the eventual merging of 3D computer graphics and cinema. Under his direction, the group created the underlying architecture of the Moviemaker’s Workspace. This technology includes 3d, the rendering environment used by the Moviemaker's Workspace (Chen 1992). 3d is an interactive computer graphics environment that handles many of the standard viewing transformations. 3d and computer graphics environments similar to it are just beginning to mature to the point where cinematic languages can be built on top of them to allow for pre-visualization.
3d has a built-in interpretive language, Tcl (tool command language) (Ousterhout 1994), and other built-in rendering and mathematical functions. Tcl is an embedable, interpretive, application-independent language. Tk (toolkit) is its companion object-oriented interface builder for X/Motif. The combination of these two tools has allowed for rapid prototyping of the Moviemaker's Workspace.
4. Background and Related Work
Moviemakers can take advantage of 3D computer graphics capabilities to create interactive pre-visualizations. In order to create a dynamic system for this use, we must first understand the fundamentals of a 3D computer graphics environment. A computer graphics environment is an interactive, graphically rendered display which is associated with a geometric model. In 3D pre-visualization, this geometric model represents the set or location. A basic function of a computer graphics environment is to display a 2D projection on the screen from a specified position in the 3D environment. In this sense, a computer graphics system performs a 3D to 2D transformation, similar in principle to the transformation that a film or video camera performs in a studio or on location. Hence this transformation or mapping is often called a virtual camera.
Background
Virtual cameras
The camera model that the Moviemaker’s Workspace system uses is a function of seven variables: world space position (x, y, z), azimuth, pitch, roll, and field of view (fov). There are, of course, other camera variables: depth of field and motion blur, for example. The Moviemaker’s Workspace system uses an idealized camera, a pin-hole camera. With the camera aperture set to a pin-hole, the depth of field is infinite; everything is in focus. While this limitation does reduce the resolution of the final output, the resulting image is still a useful representation. To implement a camera model with depth of field would slow down the rendering speed of the system. The use of depth of field is a trade-off between performance and realism, a constant source of friction in creating a 3D pre-visualization. Motion blur, or a model of a camera’s shutter speed, was intentionally omitted from the model for similar performance reasons. Another variable of the virtual camera is the aspect ratio of the screen image. The Moviemaker’s Workspace allows the user to choose from a range of standard aspect ratios.
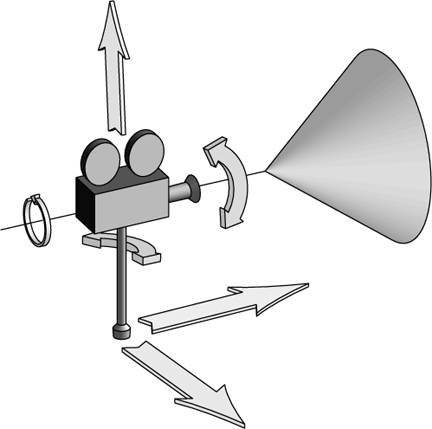
Figure 11. Virtual Camera Model.
(Drucker 1994).Virtual cameras also have some other differences with their actual camera counterparts. Virtual cameras can move through walls. They also are not bound by the limitations of traditional camera support equipment, such as dollies and cranes. While some of these differences could prove to be disconcerting if actually filmed, virtual cameras offer the advantage of the ability to view a set from any location.
Many standard cinematic terms for moving a physical camera are elastic. Their definitions can change depending on who is using them or the situation in which they get used. In the computer graphics virtual camera model, some of the standard cinematic terms have been slightly altered for more precise definitions. The following table illustrates standard cinematic terms and the virtual camera equivalent.
|
Term |
Cinematic Definition |
Computer Graphic Definition |
|
Pan |
Movement of the camera from left to right or right to left around the imaginary vertical axis that runs through the camera. |
Rotation of the virtual camera about its vertical axis. |
|
Tilt |
The camera [moves] up or down, rotating around the axis that runs from left to right through the camera head. |
Rotation of the virtual camera about the axis running laterally through the camera head. |
|
Roll |
The movement of the camera around the axis that runs longitudinally from the lens to the subject. |
Rotation of the virtual camera about the axis running through the lens. |
|
Dolly |
A shot taken from a moving dolly. Almost synonymous in general usage with tracking shot. |
Translation of the virtual camera along the axis running laterally through the camera head. |
|
Truck |
Generally, any shot in which the camera moves from one point to another either sideways, in or out. |
Translation of the virtual camera along the axis running through the lens. |
|
Crane |
A shot taken from a crane, a device resembling cherrypickers used by the telephone company to repair lines. |
Translation of the virtual camera along the vertical axis. |
|
Zoom |
A shot using a lens whose focal length is adjusted during the shot. |
Changing the field of view, or focal length, of the virtual camera. |
Table 1. Cinematic and Computer Graphics Terms Compared.
Some computer graphics definitions
Similar to the seven variables described above, the vp, vn and vu can describe a virtual camera’s position and orientation in a computer graphics environment. The viewpoint (vp) is the position in world space in which the virtual camera is located; the x, y, and z of the virtual camera variables. The vp is analogous to the location of the film plane in a traditional motion film camera. The view normal (vn) is the direction the virtual camera is pointing. This can be computed from the azimuth and pitch. The final term for defining the virtual camera is the view up (vu), or the direction of the up vector. The vu can be calculated from the azimuth, pitch and roll.
Related Work
Intelligent Cameras
Most 3D computer graphics systems allow the user to navigate through an environment by moving a virtual camera by means of some onscreen widget or an external device, such as a mouse. These methods are more concerned with how the user sees all possible views than how the user sees the one item that the user wants to view. Some recent research has been directed toward creating intelligent cameras, that is, a virtual camera that can find the position and orientation in the environment allowing the user to see the image that they wish to view.
The system described by Gleicher and Witkin (1992) allows the user to position the camera by dragging on a perspective view of the character on the screen. Instead of repositioning the character, the camera is moved so that the character is placed in the desired position. Blinn (1988) describes a method for keeping a foreground object (a spaceship) and a background object (a planet) both within the frame during a camera fly-by.
The CINEMA system permits procedural control of a virtual camera (Drucker 1992). It allows the user to create scripts, or software modules, for controlling a virtual camera within a computer graphics environment. CINEMA has two main weaknesses. First, the scripts that are created are not generalizable for other camera behaviors. Scripts in CINEMA do not permit the user to reuse portions of previous scripts to create new camera behaviors. Second, most moviemakers want more direct control of an environment than writing scripts allows.
Drucker has created a generalizable routine that maps a point within a 3D environment to a point on the screen. Drucker (1994) uses an optimization technique called feasible sequential quadratic programming (fsqp) that allows for general constraints on the desired behavior of the camera. This algorithm enables the system to present the viewer with an image based on user-definable parameters. Rather than having the user manipulate various widgets, the viewer can instruct the system to display a particular image or element of the environment.
Automated presentation
Automated presentations based on 3D models present the viewer with a continuous playout based on some user input. For example, automated presentations can be used to give a viewer information about using a particular piece of equipment. These systems generally make decisions about image framing, camera movement and the selection of material to be shown. Karp and Feiner (1990) developed ESPLANADE as a testbed for their rule-based automated presentations of animations. They incorporate such cinematic principles as multiple viewpoints and continuity. Other systems have been developed to display elements of a 3D illustration relying on design rules (Seligmann 1991). Though these presentations do not allow for user interaction, they do begin to emphasize the importance of presenting the user with visual information based on the user’s need or desire.
Cinematic Style in a Computer Graphics Environment
There have been some previous attempts to incorporate a cinematic style into a computer graphics system. Magneanat-Thalmann and Thalmann (1986) describe a system which incorporates cinematic terms such as panning and zooming into a model for a virtual camera for use in special effects generation. Others have created models for traditional optical camera variables such as motion blur and actual camera motion, such as camera head friction (Sturman 1989; Watchman 1989). This correspondence between cinematography and computer graphics terms is a necessary step to create a higher level language of the cinema in computer graphics.
These preceding methods modeled physical camera parameters. Alternatively, Lasseter (1987) attempts to draw upon traditional cinematic principles and apply them to computer animation. He discusses the use of traditional Disney 2D animation principles in computer animation. He lists many traditional animation principles such as squash and stretch, anticipation, slow in and out, and exaggeration (Thomas 1981), and describes their adoption to the computer animation process. He describes both the use of these principles in service to furthering the story of the animation and how these techniques can be applied to computer graphics in particular as demonstrated in Luxo Jr. Lasseter has not created a system that actually incorporates these animation principles, but he is one of the first researchers to list guidelines for good computer animations based on cinematic principles.
3D Modeling
One of the more difficult aspects of creating a 3D pre-visualization is creating the model. Many researchers are exploring methods for simplifying this process by using 2D images. Azarbayejani (1993) and Broida (1990) both describe systems for semi-automatically creating 3D models from video. Becker (1994) details a procedure for creating a model from 2D still images. Holtzman (1991) describes another technique for exacting 3D data from video information. These different model creation methods are beginning to simplify the process of creating a 3D model of a set or a location.
5. Video Objects
Creating realistic images that resemble the final output while still maintaining speed and usability is critical to the usefulness of 3D pre-visualization systems. The closer the pre-visualized images are to the final ones, the more powerful the pre-visualization can be. The balancing act in all pre-visualization is between speed, utility and high resolution reproduction of the desired images. Each project seeks its own balance between these goals. Certain details do remain constant: the need for faithful reproduction of the salient details and ease of use.
The single most important image in most cinematic storytelling is the human face — its expressiveness reveals much. Yet the human form, particularly the face, is one of the most difficult images to display in computer graphics. Finding methods for representing the human form is a current research topic in computer graphics. Photorealistic renderings of human forms require complex models and processor-intensive rendering. These models are typically on the order of 10,000+ polygons or surface patches. The models are also complex and time-consuming to produce. All of these factors limit the use of 3D models in pre-visualization. 3D models which are appropriate for pre-visualization are typically on the order of hundreds of polygons. Even if a 3D model of this resolution could be called up from a library, without taking time to create it, the image nonetheless suffers from poor reproduction. Such low polygon count models simply do not look like the actor that they are supposed to represent.
Since displaying the human form (particularly the face) is crucial to narrative film, finding a simple yet effective method for displaying the human form in a pre-visualized environment is critical. This thesis proposes to approximate the human form with video imagery. The introduction of video objects into the 3D environment were created to meet these requirements. Video objects make use of texture map memory available on computer graphics workstations. This memory can be used to paste images stored in the computer’s memory onto surfaces within a 3D environment. Texture map memory is a simple method for creating realism in a 3D image in a computationally efficient manner. Using this form of memory, the Moviemaker’s Workspace can display images without having to compute the complex polygonal structures of standard 3D models. While texture map memory is still a relatively recent development in computer graphics workstations, its availability is increasing, especially in computer game-playing machines. 3DO’s game-playing machine, manufactured by Panasonic, has 1 MB of texture map memory, and forthcoming machines from Nintendo, Sony and Sega are expected to include texture map memory as well. With the rise of texture map memory in game-playing systems, greater use of this element in workstations and personal computers should follow.

Figure 12. Low Resolution 3D Model and a Video Object.
Video Objects Defined
Video objects are a series of still images of an object recorded from multiple perspectives and stored as texture maps. In addition, each image has an appropriate matte, or alpha, channel stored as part of the video object, which only allows the relevant part of the texture map to be displayed. A video object also includes a normal, a vector representing the direction that the video object is facing. Video objects are typically created by rotating an object about its vertical axis and taking snapshots of the object at regular intervals. For example, in order to create a video object of 8 images, these snapshots would be taken every 45 degrees. Within the 3D environment, a video object is texture mapped onto a four-sided polygon, which then can be scaled to the appropriate size. The polygon is rotated about its vertical axis such that it always faces the virtual camera.
The Moviemaker’s Workspace determines the appropriate image to display by computing the angle between the viewing angle (vn) and the normal of the video object. The system then rotates the polygon to face the virtual camera and composites the image whose angle most closely matches the angle between the vn and the normal into the 3D environment using the matte channel. A simple method for creating the matte channel is to place the object against a blue or green background and chroma key out, or remove the color from, the background to create the matte channel.
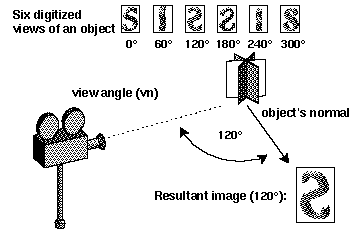
Figure 13. Video Object.
The system computes the angle between the virtual camera’s viewing angle (vn) and the object’s normal, or direction that it is facing, and displays the resultant image. In this instance, that angle is 120°. Thus, the system displays the image which corresponds to 120°.Since video objects are composed of pictures rather than polygons, they resemble their original subject more than 3D models. This advantage enables the system to produce images which more closely resemble the final output than low-resolution 3D models. This realism increases the value of the pre-visualization by displaying a more detailed image. Using the traditional 3D models for human characters gives the moviemaker images filled with boxy creatures. Also video objects cost the rendering engine only one polygon to have to compute. Coupled with the employment of texture map memory, video objects give the user both increased realism and performance.
Segmentation
One limitation of video objects is that they have no inherent segmentation. For example, the system does not know where the shoulders of a video object are. To address this concern, a simple segmentation file is created for each video object, which becomes part of the video object. This segmentation file contains the position of the center of the top of the head, shoulders, waist, and bottom of the feet. This segmentation file proves valuable when creating different size shots of the video objects. With this information, for example, the system can display a head to toe shot of a video object.
Trade-Offs
Video objects require the creator to balance a series of decisions. Texture map memory is limited. So choosing the appropriate number of images and resolution is important for maximizing the texture map memory. The most common number of images used to create a video object is sixteen. These sixteen images allow the system to present enough images of the original object to convey a sense of the original object’s three-dimensionality. This type of image is often called 2 1/2 D, since it represents a 3D object with a series of 2D pictures. Another consideration is the size or resolution of the images. At 128 x 128 pixel size, a four channel (one eight bit channel for each of the red, blue, green and alpha channels) texture map takes up 64 Kilobytes. A series of sixteen such images requires one Megabyte (MB) of texture map memory.
A further consideration is whether the video object should convey motion. The video object can hold a series of images from each angle which, when displayed in succession, show the video object in motion. For example, to show a character walking, the system could have a series of images taken from each angle with each individual image displaying a different phase of the character’s gait.

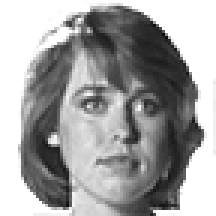


Figure 14. Four Different Resolution Video Objects.
Clockwise from the upper left, the resolutions of the texture maps are 512, 384, 256 and 128 pixel squares.This range of variables (size, number of angles and motion) provides the user of the Moviemaker's Workspace with many options from which to choose the best fit for the project. In testing, the 128 x 128 pixel texture maps are only good for showing the whole body. There is not enough resolution to see facial detail. The amount of facial detail required will vary from project to project, but in testing, detail is usually more important than motion. The test environment for the Moviemaker’s Workspace uses video objects of 512 x 512 pixels of 16 different angles. A 512 x 512 video object, for example, requires 2 MB per full-color image (1 MB for black and white) for a totaling 32 MB for a 16 image video object. This increase in resolution provides much clearer images, but it comes at the price of texture map memory.
Video Object Production
The creation of video objects is simple. The name video objects is a holdover from their original production method, where the images were digitized from video footage. In the first generation, a Hi8 video camera was used to capture a football player running in place in front of makeshift blue screen, plywood painted with chroma key blue. The background is easily removed in a graphics processing application. To increase the resolution of the video objects, 35mm film was then used as an acquisition medium. The 35mm film was transferred to PhotoCD for import into the digital environment. A digital camera would be an even simpler method of acquisition. As more video objects are used, a library of images will be created. This library can consist of not only pictures of characters standing, but also of characters engaging in various tasks, such as writing and jumping, or whatever action a character is required to perform.
Limitations of Video Objects
Video objects cannot display all views of the character they represent. Typically they are comprised of only sixteen different views. Each view then represents 22.5° around the character, thus many different views are not included. If the user wishes to see a view in between one of these sixteen, it is simply not available. Also, video objects have no facility for handling shots from directly below or above. Since a shot from directly below is rarely used, this limitation does not hinder the usefulness of video objects. Video objects can display usable images for shots from above for all except directly above the object. For video objects to display motion, they require large amounts of texture map memory.
6. Camera Framing & Motion
MEDIUM SHOT OF MARIAN . . . POV INDY
AS MARIAN PUTS HER COLD SHOT GLASSES TO HEAD, A SHADOW LOOMS OVER HER.
INDY (offscreen)
Hello Marian
MARIAN
Indiana Jones. ([crosses] TO HIM) I always knew that you’d come walking through my door.
The preceding excerpt is from a modified shooting script from Raiders of the Lost Ark in which Indiana Jones (Indy) first meets Marian. A shooting script is a form of the script that has been approved by the director and producer and is used as a guide during production. It usually includes scene numbers, framing information, prop details and often character and camera movement. It is important to notice the primacy given to the camera framing, the size of the image’s main object. The first detail in describing the scene is the camera framing: "MEDIUM SHOT OF MARIAN." Camera framings are a succinct way of describing the size of the primary object in an image. Most people are familiar with the basic descriptions of close-up, medium shot and long shot. If we add to this list close shot and full shot, we have what many people consider the five basic camera framings, or cuttings. These shot descriptions are elastic. Directors often speak of a long shot of a building or a close-up of a watch. In general, these terms are used to describe boundaries of the human figure. For example, a medium shot is usually considered to be a framing of an actor from slightly above the head to just below the waist. Even here the terms are elastic. One director’s medium shot will not exactly match another director’s. A medium shot can be relative to a series of shots where the term medium shot refers to the framing which is in between a closer shot and a longer one.
The traditional breakdown of a motion picture is into frames, shots and sequences. The fundamental visual element of motion pictures is a frame. A frame displays a state of an animation at a particular time. It is a single image, whether it is a single frame of motion picture film, a pair of interlaced video fields or a frame of computer animation. If the frames are displayed at a sufficient rate, the illusion of motion is achieved. For motion picture film, this rate is 24 frames per second (fps) for the recording of the image, and 25 or 30 fps for video. For projecting film, each image is then typically displayed twice for an effective rate of 48 fps. The most basic unit of expression in a cinematic language is the shot, a temporal stream of frames. A shot is defined as "consist[ing] of one or more frames generated and recorded contiguously and representing a continuous action in time and space (Davenport 1991)." Shots can be further grouped together to form a sequence. Terms such as close-up typically refer to both the image size of the primary object and to a shot, a series of frames, in which the primary object is framed in that manner. For the purpose of using shot framings in the Moviemaker’s Workspace, they refer to a framing of an individual frame.
Shooting Scripts
When one reads a shooting script, most people create images in their head to match the descriptions in the script. The form and language of a shooting script are designed to evoke moving images with words, making use of cinematic language. This use of language to describe moving pictures served as motivation for creating a cinematic language for navigating a 3D environment. The Moviemaker’s Workspace attempts to allow the user to interface with the system using the language found in shooting scripts to describe both character and camera motions.
Camera Framing
The standard method for describing a shot is determined by its framing. Since much of the language of describing a shot is based on camera framings, it seems natural to start building a cinematic language on the basis of standard camera framings. In creating a pre-visualization, the Moviemaker's Workspace system uses these shots as the basic units for creating a continuous playout. To create these fundamental elements, we need to develop a mapping between the general cinematic definition of a shot and the representation within the computer graphics environment.
The elastic cases of camera framing aside, there is some agreement on the general definitions for the camera framing of human figures. For use in the Moviemaker’s Workspace, the general agreement as defined by some elementary texts on filmmaking are used as a starting point for defining a method of generating camera framings (Arijon 1976; Katz 1991; Thompson 1993).
As discussed in chapter three, one of the goals of the Moviemaker's Workspace system is to serve as an assistant in creating a pre-visualization. To this end, generating a camera position with the desired framing can be thought of a means of navigating a 3D environment. In this model, the user gives the system a request for a particular image (e.g. "close-up of Rick") . The system then applies an optimization routine to generate a virtual camera position which yields the desired image. The following sections detail some examples of applying this model of interaction to framing characters in a computer animation using standard cinematic terms.
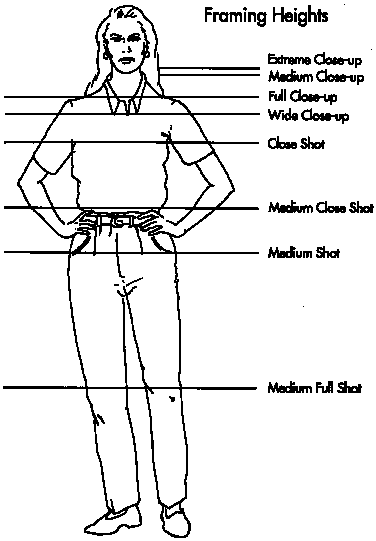
Figure 15. Framing heights.
(Katz 1991).Close-Up
With the growth of television and its small picture area as compared to a projected film, the close-up (CU) has grown in importance. In Joseph V. Mascelli’s The Five C’s of Cinematography, he calls the close-up one of his five Cs. Close-ups are used to bring the viewer closer to emotions of the character. The standard definition of a close-up is a shot that encompasses the entire head with some room at the top of the screen above the top of head, called head room, and showing some of the shoulders. There are many different flavors of close-ups: extreme close-up, medium close-up, wide close-up and the close shot.
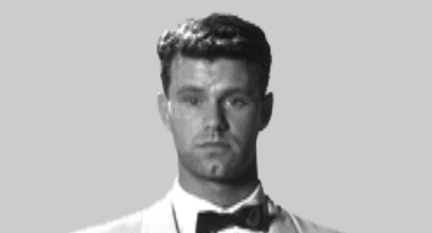
Figure 16. Close-up.
The Moviemaker’s Workspace permits the user to ask the system for any one of these different types of close-up for a particular character: close-up of Rick, for example. The system then performs an optimization function to find the appropriate position for the virtual camera. No system will ever be able to generate the exact image a moviemaker envisions, but this system presents the user with an approximate framing. The user can then make the more localized changes (e.g. pan and tilt) to find the desired framing.
Medium Shot
In the Golden Age of Hollywood, the medium shot was the standard shot. It is, like its name implies, half way between a full shot and a close-up. The medium shot is close enough to show facial details and far enough away to show some body movement. There is much disagreement over the exact definition of the medium shot. This lack of precision is due to the elastic nature of such a name. According to most elementary filmmaking texts, a medium shot frames the character from the top of the head to somewhere just below the waist.

Figure 17. Medium Shot.
Full Shot
The full shot is a camera framing which shows the entire body from head to toe. This shot is ideally suited for showing a character’s body language and motion. Because of the rise of television and its reliance on close-ups, the full shot has fallen out of favor recently. When a full shot is used today, it is generally used as an establishing shot.
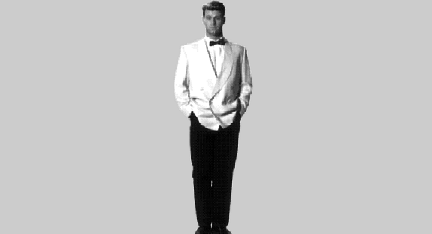
Figure 18. Full Shot.
Long Shot / Establishing Shot
In traditional Hollywood filmmaking begun by D. W. Griffith, the first shot in a scene would frequently be an establishing shot. This shot would set the geography and the people of a particular scene. The long shot is a shot of a character in which the viewer can see a significant portion of the background, similar to an establishing shot. The long shot is difficult to define in precise terms. Each scene has its own measure of the long shot. This elasticity makes it difficult to create a generalizable long shot. Typically, it frames a character from head to toe and reveals some significant portion of the background.
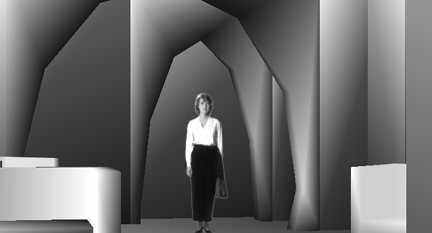
Figure 19. Long Shot.
Gaze Vector
The preceding definitions for static camera framings all had the actor staring directly at camera. All the actors were placed in the center of the frame. If the moviemaker wants to frame the actor such that they are looking somewhere other than directly at the camera, there are other basic framing guidelines which are applicable. In previous cases, the character’s gaze vector would be coming directly out of the screen toward the viewer. The gaze vector is the direction in which the actor is looking. For example, in figure 20, the actor is looking left. Once again, there are no universally agreed upon conventions for framing shots in relation to gaze vectors. "Conventions in western art favor portraits that position the human face slightly off center to avoid disturbing symmetrical compositions. The customary solution is to leave extra space on the side of the screen that the character is looking at and more space at the bottom of the frame than at the top (Katz 1991)." When the gaze vector is to the left, for instance as in figure 20, the character should be positioned in right half of the frame such the character is looking into the space on the left portion of the screen. The framing in figure 20 is a particularly useful shot. It has its own name: 3/4 shot. A 3/4 shot is a framing with a gaze vector of either left or right and the character’s eyes are looking 45° away from directly at the camera.

Figure 20. 3/4 Shot.
When the user asks the Moviemaker's Workspace system for shot framing with a given gaze vector and an angle of the character’s face relative to the camera, the system attempts to offer the user an image with the character at the given angle and facing in the appropriate direction.
Point of View (POV) Shot
Another type of shot is the point of view shot. Point of view (POV), as the name implies, is a shot framed from the viewpoint of a particular character. There are many different degrees of POV shots. At one end of the spectrum, there are literal POV shots. These shot are literally as if the camera were the character’s eyes. This type of shot is often called the subjective camera in traditional Hollywood language. The viewer feels as if they are in the scene as opposed to being an unseen viewer. Another type of POV shot is taken from just next to the character whose point of view is being represented. This shot gives the viewer the impression that "they are standing cheek-to-cheek with the off-screen player (Mascelli 1965)." Point of view shot also has a more general meaning when it follows a shot of character looking off-screen. In this case, if the shot following the off-screen gaze has almost anything in it that the character could be looking at, the shot is also called POV. The Moviemaker's Workspace system can generate a literal POV shot of the desired character.
Two Shot
Another standard shot in narrative film is the two shot. As the name implies, the two shot is a shot of two characters. Similar to the standard static camera framings, the name two shot can be modified by a name for the image size. For instance, there are medium two shots (often abbreviated 2 MS) and long two shots (2 LS). The medium two shot was so popular among Hollywood filmmakers of the Golden Age that Europeans called it the American shot.
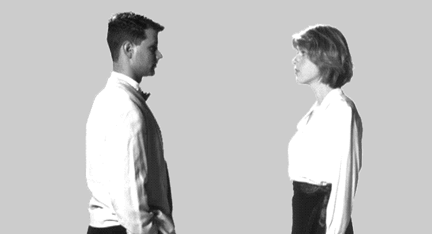
Figure 21. Medium Two Shot
180° Rule
One problem with creating a two shot is on which side of the characters to place the camera. In film and television, this problem has been solved by keeping the camera on same side of the 180° line, or variously called the axis of action or the center line. In a two character scene, the 180° line is the line that can be drawn from one character to the other. In figure 22, the numbered cameras (1, 2, 3) are all on the same side of the 180° line. The 180° degree rule states that the moviemaker should always keep the camera on the same side of the 180° line while the characters remain stationary. If a camera were to be placed on the other side of this line, as in position X, it would violate the 180° rule. The 180° rule is really a guideline rather than a rule. The reason the 180° rule exists to maintain shot to shot continuity. In this example, when the camera is at position 1, 2 or 3, character A will always be on the left side of the screen. At position X, character A would be on the right side of the screen, thereby violating continuity. The rule ensures that there is a common space from shot to shot. It also ensures constant screen direction.
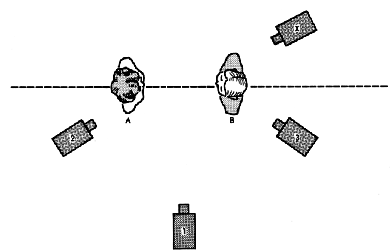
Figure 22. 180° Rule.
The cameras 1, 2, and 3 are all on the same side of the dotted line, the 180° line. If a camera were placed at position X, it would disturb continuity. To preserve continuity, cameras are kept on the same side of the 180° line (Bordwell 1990).When giving the user a camera framing for a single shot, the system defaults to presenting the user a shot from directly in front of the character. In generating a two shot, the system has no such default. There are at least four different positions that the two characters could be in relation to each other: directly facing each other, facing away from each other, with one character’s back to the camera and side by side. The problem becomes how does the system define the canonical two shot. A simple solution to this problem is to find the framing with one character on each half of the frame. In terms of mapping each character to one part of the frame, the system attempts to map the left-gazing character onto the 1/3 line (the vertical line 1/3 the way across the frame from the left edge) and other character onto the 2/3 line, regardless of the direction the characters are facing. The system also ensures that the generated viewpoint is on the same side of the characters as the preceding camera.
Over the Shoulder Shot
Over the shoulders shots (OTS) are popular for interviews as they quickly establish the spatial relationship between the two characters. Arijon defines the screen position for two characters in an OTS as "the actor who speaks is given two-thirds of the screen space, and the interlocutor is given one third (Arijon 1976) " This translates into placing the dominant character on one of the 1/3 lines, depending on gaze vector direction, and the interlocutor centered between the other 1/3 line and the edge of the frame.
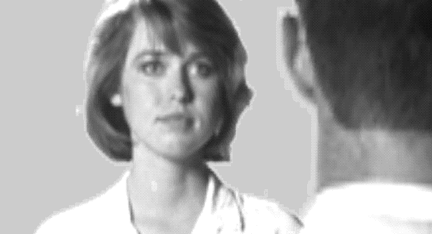
Figure 23. Over the Shoulder Shot.
Triangle System
The triangle system is a convention for camera placement. It proposes that there are three camera positions, all on the same side of the 180° line, needed for a given scene. The triangle system can work for a wide range of scenes, from action scenes to single character scenes. Figure 24 shows a typical triangle set-up for a conversation. One camera is for a two shot, and the other two cameras are for close-ups of the individual characters. For dialogue scenes, the camera positions in this example are set-up for shot - reverse shot. The two cameras have similar framings of their respective characters. The framings are similar to facilitate smooth editing. There are other alternatives for these shots. They can be OTS, POV, profile or single shots depending on the requirements of the scene.
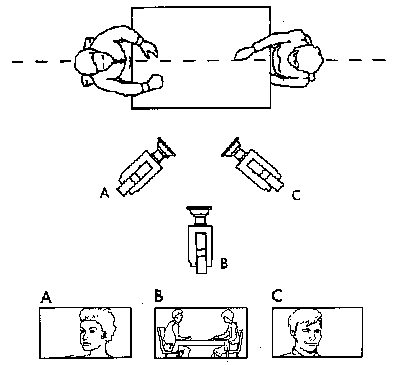
Figure 24. Triangle System.
(Katz 1991).Camera Motion
The camera framing is a succinct method for describing a static camera framing, but there are also other types of shots. Most obvious are shots involving character motion and/or camera motion. Cinema has developed a language for describing these shots as well. Some of these terms were defined earlier in Table 1, such as dollying, trucking and craning.
Tracking shot
More complex moves are usually termed tracking, or traveling, shots. A tracking shot is generally any shot in which the camera moves. While this definition is broad, it can still serve as an interface to any camera motion. For instance, the Moviemaker’s Workspace allows for multiple methods for creating tracking shots. The simplest method is a POV tracking shot. This type of shot a literal POV of a particular character. The shot tracks, or travels, with character as it moves through the environment. Another type of camera motion available to the user is a simple tracking shot. This shot will keep the direction that the character is facing to the camera constant over a range of frames. This simple tracking shot does not place any limits on the camera rotation speed. A more complex version of tracking is the ability to interpolate between camera positions. In the Moviemaker’s Workspace, the user can interpolate between two camera positions or draw a path for the virtual camera to take as the animation moves.
7. Cinema Languages
In pre-visualizing a scene, moviemakers are constantly trying to find tools which make it easier and faster to create visualizations. The Moviemaker's Workspace strives to give moviemakers a series of tools which will make the process of creating an interactive pre-visualization to meet these goals. The creation of a tool for framing a character is a first step towards the larger problem of encoding cinematic knowledge. The more understanding the system contains about the process of creating a movie, the more assistance the system can give in creating a pre-visualization. By giving the system knowledge of the production and post-production processes, it can begin to make smart suggestions and intelligent assumptions for the user. For instance, during production the director and director of photography (DP) generally attempt to create a type of communication that allows them to minimize needless discussion. There is an implicit understanding of cinematic knowledge that exists between the two. The more of this knowledge a pre-visualization system can encode, the more time can be directed towards more creative and problem solving tasks.
Over the past century of the cinema, many different forms of cinematic styles have emerged. These styles, often called languages, serve as a method for communicating ideas using the cinema as a medium of expression. As the cinema has grown, certain styles have dominated. That is, certain of these styles have succeeded in winning over many moviemakers to using them. These styles have many defining features: camera angles, camera placement, lighting, set design and editing. Of most importance to the Moviemaker's Workspace system are the camera angles and camera placement. If this positioning of the camera can be codified into a system, the Moviemaker's Workspace system could then give users a series of camera positions with framings that would match a particular cinema language.
When creating a motion picture, the moviemaker seeks to order a series of shots to create an effect in the viewer. In creating a 3D pre-visualization system, the system can create a series of shots in a given cinema language. Using standard elements from a given cinema language, the system can present the user with a group of camera positions and framings in that particular cinema language. The general notion of encoding the standard definitions of cinema language allows the user to take advantage of the system's knowledge of these languages. Since many cinema languages can be classified by their camera positioning, a template can be created from each language’s basic patterns, rhythms and tendencies.
Master Scene Cinema Language
D. W. Griffith is usually credited with developing what has become the most common language, certainly in Hollywood. This style is commonly called master scene language, after the establishing shot that typifies the language. A master scene usually is the one shot that records all the action in a single shot. The framing usually encompasses all of the relevant scenery and characters in a given scene. It is called a master scene because all other takes from the given scene are some portion of the master scene. Master scene language is defined by the successive takes of a scene which are shot with an establishing shot, a medium shot and a close-up. Each scene in the script is recorded in its entirety at successively closer framings. This over-recording allows the moviemaker more flexibility during editing, as each scene has been recorded in multiple framings. Originally this over-recording was done to allow the viewer to understand the scene better by overlapping the action with successively closer framings. This method of editing was quickly changed so as not to overlap the action, but the notion of recording the entire scene from many different positions has endured. It is favored by editors for the large range of choices that it affords the editor during the post-production process.
Master scene language also includes many other distinguishing features. One of the most obvious elements of master scene language is the repetition of shots, or camera framings. The standard pattern is long shot, followed by a medium shot and then a close-up. While this pattern is rarely employed today in that exact progression, it can still serve as a template for the Moviemaker’s Workspace. Often in master scene language, there are repetitions in the order of camera positions. If each camera position is given a letter, then a typical pattern can be denoted by A-B-A, A-B-A, A-B-A.
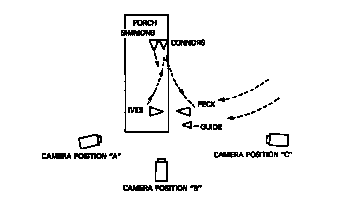
Figure 25. Master Scene Example.
In this plan view of a scene from William Wyler’s Big Country, Simmons, Connors, Ives and Peck are all actors. The three cameras used for this scene are denoted A, B and C. In the edited film, Wyler uses successively closer framings from each of these positions (Richards 1993).Another typical pattern of master scene language that is often used during a conversation is a slightly different form of a progression. In this pattern, the scene begins with a two shot. It is followed by an over the shoulder shot and then a close-up. The close-up is the most important shot, and it usually coincides with an important line of dialogue. This type of shot is often called a payoff shot.
An invisible cut, which is an edit where the viewer is not aware of the change in camera position, is a common type of transition employed in master scene language. This transparency is achieved through both camera placement and editing. One of the most common methods of achieving an invisible cut is through camera positioning without sharp angles to draw attention to the camera angle. Placing the camera in the most natural position so as not to draw attention to it is an difficult issue. There is not universal agreement on the most natural position. But there are certain guidelines that can be followed.
Master Scene Template
In the Moviemaker's Workspace, there is a template of camera framings for master scene language. This template attempts to encompass most tendencies of master scene language. Since the most standard shot of master scene language is the establishing shot, it is natural that a long shot (LS) of the primary characters is included as a possible establishing shot. If the scene involves a conversation between two characters, the template also provides a medium two shot (2 MS), the American Shot. Other shots included in the template are the successively closer framings. Thus the template also includes medium shots of both characters, and both character’s over the shoulder shots at a medium framing (Med OTS) and a close-up (CU OTS). To allow for the payoff shot, the template also includes a close-up (CU) of each character.
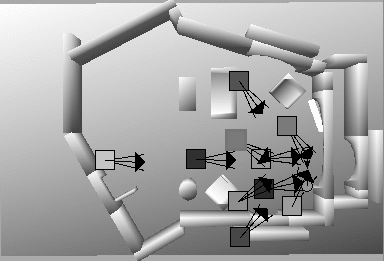
Figure 26. Mater Scene Cinema Language Template.
This master scene template gives the user ten camera positions with possibly relevant framings. From just one instruction from the user to set-up a master scene template, the system generates these different camera positions. These camera positions are certainly more than the triangle system dictates is necessary, but the user can easily choose the appropriate ones. The user can then quickly create an edit of the scene using these suggested camera positions without having to navigate the 3D space to find these relevant positions and framings. Once the system has made these suggested camera positions, the user can then easily make the more localized changes to the position for the exact framing to suit the moviemaker’s vision.
Interpersonal Cinema Language
Interpersonal cinema language (I-P) is another commonly used cinema language. The defining characteristic of the I-P is the single shot, a shot of just one character. By using single shots of the characters, the moviemaker casts the viewer as an offscreen character. This bond between viewer and subject is what gives interpersonal cinema language its strength. As with master scene cinema language, an establishing shot is often used to begin by setting the scene. Then I-P typically moves to a series of single shots, which do not necessarily duplicate literal point of view. Similar to master scene cinema language, I-P uses a repetition of shots. This repetition makes I-P an ideal candidate for a camera position template.
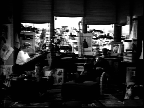
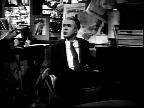
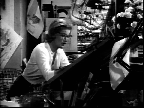
Figure 27. Examples of Interpersonal (I-P) Framings
. These three shots are from Hitchcock’s Vertigo. From left to right, they are an establishing shot and two single shots.Interpersonal Template
The Moviemaker’s Workspace creates an I-P template of camera positions that the user can call up at the press of a button. Currently the I-P template only is designed to work on a two character scene. Similar to the master scene template, the I-P template gives the user an establishing shot, a long shot. It also includes a medium two shot. The user can set the character’s gaze vector. The system presents the user with a full shot, medium shot and close-up of each character with the correct gaze vector.
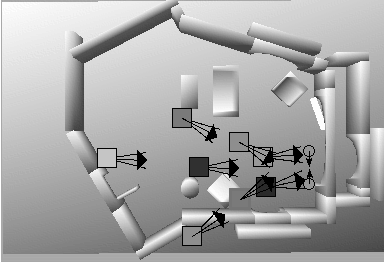
Figure 28. Interpersonal (I-P) Template.
8. Future Directions
The Moviemaker’s Workspace is a first step in encoding cinematic knowledge into a computer system. There are many other steps in this process. One obvious direction is the encoding of simple guidelines of editing. Some examples might be setting up a master scene progression (long shot, medium shot, close-up), avoiding jump cuts, and selecting appropriate match cuts. Much like the Moviemaker’s Workspace can now assist in navigating the 3D environment, an editorial assistant can suggests a simple series of cuts for the user. Another simple progression on the already existing environment would be for the system to retain framing and motion information even if the characters are repositioned, such as a change in blocking.
Gesture
One of the more common methods of describing moving images is by waving and gesturing of hands. A stereotypical image of a film director is with hands and out-stretched arms framing a shot. With advances in human computer interface technologies, a methodology could be created for using hand gestures in navigating the set and creating camera framings.
Interactive movies
The possibility of interactive motion pictures appears to be on the horizon. One early example is Interfilm’s I’m Your Man, which allowed viewers to make decisions in the playout of the movie by pressing buttons located in front of the theater’s seats. The use of 3D pre-visualization systems will become an even more critical element in creating these new forms of motion pictures.
Structured video
By working with the 3D data of the set before production, this data can not only be reused in other stages of production, but it also be used by new viewing paradigms. Structured video, or model-based video, is one such new paradigm that refers to the representation of moving images by its component parts. By representing each part of an image, such as background and characters, as a separate element, the system can alter or change completely these elements based on a script. One such system, currently under development, is the Cheops architecture, a data-flow computer optimized for the realtime display of video (Bove 1991; Bove 1994). Using data from the pre-visualized set can aide such a system by providing 3D information for easier reconstruction of the model.
Production and post-production tools
The ability to reuse the data gathered in the pre-visualization phase during production and post-production can further assist the motion picture process. Computerized continuity systems, such as Slipstream (Lasky 1990), provide the ability to assist on the set with the details of maintaining continuity. By using data from pre-visualization, continuity systems can easily adapt changes as they occur during production. Editors can be adding actual footage to pre-visualize animatics to shape a motion picture as it is being shot. Post-production can benefit by using the 3D data to assist in compositing special effects.
9. Conclusion
As computers with the necessary graphics power, speed, and capabilities for interactive 3D pre-visualizations have become available, the nature of the production of motion pictures has undergone a subtle, yet definite, transformation. This transformation started in special effects generation. Computers first entered into motion picture production during the post-production processes. Where model makers used to build physical models, now we have 3D animators creating computer generated imagery instead. Where film editors used to cut and splice film, we now find them pushing buttons in front of digital non-linear editors. This technology will continue to modify the entire production cycle, including the pre-production phase. In fact, it already has for the more elaborate and complex action scenes. But it will also ultimately change the entire motion picture process as more and more of the aspects of production move into the digital domain. This change will include not only the recording of images, but also the ways in which viewers will interact with motion pictures.
While these new digital tools have created the possibility of 3D pre-visualization, they have not enabled moviemakers to simply explore such a space. This process of using a 3D pre-visualizations needs to leave the realm of computer graphics and enter into the domain of moviemaker. This transition is just beginning to occur. To facilitate this change, computer systems are in the process of becoming more cinematic. That is, these systems are encoding cinematic knowledge into the environment. The Moviemaker’s Workspace is a preliminary step in this process. It shows how using cinematic knowledge in a 3D system can aid a moviemaker in creating an animatic from a 3D pre-visualization. For example, it enables motion picture creators to navigate the 3D environment of the set using terms better suited for describing cinematic images: close-up, tracking shot and medium two shot.
References
Arijon, Daniel. Grammar of the Film Language. Los Angeles: Silman-James Press, 1976.
Azarbayejani, A. and A. Pentland. "Recursive Estimation of Motion, Structure and Focal Length." In IEEE PAMI in 1993.
Becker, Shawn and V. Michael Bove, Jr. "Semiautomatic 3-D Model Extraction From Uncalibrated 2-D Camera Views." Proc. SPIE Image
Synthesis (In press), 1995.Blinn, Jim. "Where Am I? What Am I Looking At?" IEEE Computer Graphics and Applications (1988): 76 - 81.
Bordwell, David and Kristin Thompson. Film Art. Third ed., New York: McGraw-Hill, 1990.
Bove, V. Michael, Brett Granger and John Watlington. "Real-Time Decoding and Display of Structured Video." In IEEE ICMMCS ‘94 in Boston, MA, 456-462, 1994.
Bove, V. Michael and John Watlington. "Cheops: A Modular Processor for Scalable Video Coding." In Visual Communications and Image Processing '91, SPIE, 886-893, 1991.
Broida, T.J., S. Chandrashekhar and R. Chellappa. "Recursive 3-D Motion Estimation from a Monocular Image Sequence." IEEE Transactions on Aerospace and Electronic Systems 26 (4 1990).
Davenport, Glorianna, Thomas Aguierre Smith, and Natalio Pincever. "Cinematic Primitives for Multimedia." IEEE Computer Graphics and Applications (July 1991): 67-74.
Drucker, Steven, Tinsley Galyean and David Zeltzer. "CINEMA: A System for Procedural Camera Control." In Symposium on Interactive Computer Graphics, SIGGRAPH in Cambridge, MA, ACM Press, 67-70, 1992.
Drucker, Steven. Intelligent Camera Control for Graphical Environments. Ph.D. Thesis, Massachusetts Institute of Technology, 1994.
Foley, James D., Andries van Dam, Steven K. Feiner and John F. Hughes. Computer Graphics: Principles and Practice. Reading, MA: Addison-Wesley, 1990.
Gleicher, Michael and Andrew Witkin. "Through-the-Lens Camera Control." In SIGGRAPH in Chicago, ACM Press, 331-340, 1992.
Hitchcock, Alfred (Director). North by Northwest [Laserdisc]. Los Angeles: Voyager Company, 1988.
Holtzman, Henry. Three-Dimensional Representation of Video using Knowledge Based Estimation. SM Thesis, Massachusetts Institute of Technology, 1991.
Karp, Peter and Steven Feiner. "Issues in Automated Generation of Animated Presentations." In Graphics Interface in Halifax, Nova Scotia, 39 - 48, 1990.
Katz, Steven D. Film Directing Shot by Shot: Visualizing from Concept to Screen. Studio City, CA: Michael Weise Productions, 1991.
Lasseter, John. "Principles of Traditional Animation Applied to 3D Computer Animation." Computer Graphics 21 (4 1987): 35-44.
Lasky, Alan. Slipstream: A Data-Rich Production Environment. SM Thesis, Massachusetts Institute of Technology, 1990.
Mascelli, Joseph V. The Five C’s of Cinematography. Hollywood: Cine/Grafics Publications, 1965.
Monaco, James. How to Read a Film. New York: Oxford University Press, 1981.
Richards, Ron. A Director’s Method of Film and Television. Boston: Focal Press, 1992.
Sanders, Lauren. "Step by Step: The How-To’s of Visual Problem Solving." Millimeter 21 (10 1993): 94-95.
Seligmann, Dorée and Steven Finer. "Automated Generation of Intent-Based 3D Illustrations." Computer Graphics 25 (4 1991): 123-132.
Sturman, David J. Motion Picture Camera and Computer Graphics. 1989. Internal MIT Media Laboratory paper: 1989.
Thomas, Frank and Ollie Johnson. Disney Animation: The Illusion of Life. New York: Abbeville Press, 1981.
Thompson, Roy. Grammar of the Edit. Oxford, England: Focal Press, 1993.
Toland, Gregg. "How I Broke the Rules in Citizen Kane." In Focus on Citizen Kane, ed. R. Gottesman. 73-77. Englewood Cliffs, NJ: Prentice-Hall, 1971.
Watchman, Joel. "Synthetic Camera/Real Motion: Camera Dyamics in a Simulated World." Internal MIT Media Labrotory: paper: 1989.